Wednesday 27 September 2017

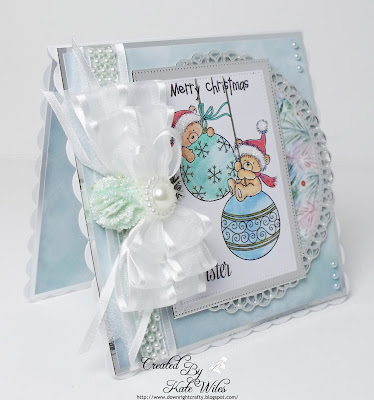
Merry Christmas Sister

Good morning

Here I am again with my weekly inspiration from


This time I decided to use my spectrum noir pencils on their own, to get a softer look.

I used
Image and Sentiment - Teddy Baubles


This is a 6" scallop card blank


The contrast on this one is silver, which works so well with the softer cooler papers.  I used a spellbinders fancy grand circle and a plain circle to make the layer and a MFT punched rectangle die to create the layer and cut out the image.  I added a strip of ribbon around the card and added on top of this some pearl string, before adding the double triple white bow, a pearl medallion, a snowflake charm and a glittered flower.  I finished off with tonic pearl dots and some tiny pearls.


The image is coloured in Spectrum Noir pencils, with stickles for the fur and a gold gel pen for the bauble details.

I thank everyone for all of their lovely comments and I will be back again soon and thank you for taking the time to view my blog, my items are now for sale on my etsy shop.
hugs
Kate
xx

Saturday 23 September 2017

Christmas Advent Calendar

Good afternoon all

What a lovely day it is, not too cold and some lovely sunshine.  I have been sat out on the decking with the girls having a cuppa, watching the day go by.  

Anyway this is something I bought about four years ago, and knew that at some point I would eventually get around to creating it and decorating it.  This year is perfect for it to be used as Joshua will need an advent calendar, what we do for our grandchildren :).  It took quite a while to complete but well worth the work.

So here it is


It is a Kaiser Advent Calendar kit.  Matt and I spent half a day undercoating with spray paint and then adding the glitter top coat.  This then allowed me to be creative with everything else on my own.  I created the paper fronts for the draws by making a stencil on my scan n cut and then creating an inset line, this made a perfect size for the front of each draw.  I carefully cut the centre piece and added this.  I used a die I got ages ago from Simon Says Stamp to cut out all the numbers.  I added pearl strings all the way around the inner edge.  I cut my Sentiment in gold mirror on the scan n cut.  I then added, although you cannot see them some bottle lights, the plastic cork and gubbins is under the big poinsettia in the right hand corner.  I added all of the flowers and once dry weaved the lights around the flowers.  I then added the holly and finished off with glitter on all the leaves.  The baubles are little polystyrene balls, sprayed with lacquer and then glitter added.  I had to put a pin in them whilst I was spraying as they kept floating off.

I love how it turned out.

Anyway I hope you are all having a lovely day, what ever you are doing and thank you to all of my visitors for their lovely comments.

Bye for now
Kate 
xx


Wednesday 20 September 2017

Boozy Santa

Good morning

Here I am again with my weekly inspiration from


I wanted the image to really pop off the page so used one of the plain background papers in this paper pack so as not to distract the eye. He looks so content sat there doesn't he.

I used
Image and Sentiment - Boozy Santa


This is a 6" scallop card blank


The contrast on this little card is silver mirror card.  I have used Sue Wilson dies for the background detailing and fussy cut Santa and his big bottle out to sit nicely on the bottom of the card.  I have added pearls, a triple double bow, a fancy button, two little bells and a glittered flower to finish the look.


The image is coloured in copics, adding a white gel pen for highlights, glitter for the champagne and for the fur.

I thank everyone for all of their lovely comments and I will be back again soon and thank you for taking the time to view my blog, my items are now for sale on my etsy shop.
hugs
Kate
xx

Wednesday 13 September 2017

We wish you a Merry Christmas and a Happy New Year - from the Singing Penguins

Good morning

Here I am again with my weekly inspiration from


I love this image and I added a curve of snowy acetate over the image to give it the snowy look. The Wild Rose Studio products

I used are
Image and Sentiment - Singing Penguins


This is a 6" scallop card blank


I used silver mirror card as the contrast and layered the papers onto this, I then used a new background die that is all snowflakes.  I stamped the image and then masked it off, to be able to air brush the background for the sky area.  I then coloured the image and stamped on the sentiment.  Before placing the image on the card I measured, scored and then wrapped the snowy acetate over the image to create a dome effect (image below).  I finished with string diamante around the edges, a little triple bow, a fancy button and a flower.  I added tiny diamante's to the centers of the snowflakes on the background die.


You can just spot the acetate dome if you look closely.


The image is coloured in copics.

I thank everyone for all of their lovely comments and I will be back again soon and thank you for taking the time to view my blog, my items are now for sale on my etsy shop.
hugs
Kate
xx

Sunday 10 September 2017

Creative Stamping Magazine

Good morning to you all

Hoping you are all safe and well

Just wanted to pop on and give you the heads up.

The new issue of Creative Stamping is now on the shelves and if you love Wild Rose Studio, the free stamps in this issue contains one of our lovely Wild Rose Studio stamps. 

Here is an example of what you can make with this free image, if you would like to know how to make this, the instructions are in the magazine. 

There are lots of other free stamps to make some amazing Christmas Cards too. So do pop along and buy your copy.


hugs
Kate
xx


Wednesday 6 September 2017

Merry Christmas with Teddy Baubles

Good morning

Here I am again with my weekly inspiration from those new releases from


I just love the two new bunny images in this release, really struggled to choose which one to use first.  I ended up selecting this cutie to make a lovely colorful Christmas Card

I used
Image - Teddy Baubles


I used a side stepper card with a scallop edge


I used silver mirror card as the contrast and layered the papers onto this, I fussy cut out the image and placed on foam pads.  I added the sentiment and then the holly flourishes, before finishing with a bow, a rhinestone sparkler some flowers and the tonic pearl drops.


The image is coloured in copics with a little gold gel pen and a little white gel pen.

I thank everyone for all of their lovely comments and I will be back again soon and thank you for taking the time to view my blog, my items are now for sale on my etsy shopapart from this one as it is for our lovely Dulcie.
hugs
Kate
xx

Items for Sale in My Etsy Shop

Related Posts Plugin for WordPress, Blogger...
 
09 10