Friday, 9 October 2009

Whiff of Joy Male Birthday Card and Copics

Today I got up to another lovely day, got my ironing out of the way (by that pile does grow when your not watching it and having such fun with your crafting). I then waited for the washer repair man, yes all that washing killed the machine off. However will be able to spend more time in the "Beach Hut" as he needed to order more parts and is not coming back till Tuesday.

Went for the weekly shop, whilst my son painted the fence. Wow it is all painted now and looks so much better.

Then ran upstairs to create a birthday card for Matt's dad. I normally really struggle with male cards, but this one sort of happened quite easily. I even half way through thought that without realising it I had met the colour create challenge,

The colour combination is RED, YELLOW, BLACK and WHITE.
The optional extra - FLOWERS and CHECKS

..........so continued the colour theme into the 'oakley with slipover' whiff of joy image. (This image I got from Maz as a swop. Used a large amount of copics, more than normal. Used a punch to show more of the yellow through and turned the corner and used a yellow brad to hold it down. Edged everything with Tim Holtz distressed photo and here he is.

I tried to take better photo's but my little camera is a few years old now, however Matt ordered me a new one so hopefully the images will be so much better after it has arrived and I have played with it a bit.

Well hoping you all have a good weekend, I know I will as no washing and two more birthday cards to make.

Thanks for Looking
Kate x


Tuesday, 6 October 2009

Penny Black Xmas and Copics

Just a quick post following on from the one earlier. Made another two cards.

I used my trim craft stack of papers, some ribbon, gold and silver mirror card and several copics and the "Atyou" glitter pens.

Just love colouring and shading the little snowman and it is so nice to see how he has changed from last year.

I bet he likes his outing too.

Matt says he is so impressed with my new style of shading, I knew that practice makes you better, but pleased he has noticed considering he is an artist. I learnt all I know from him. Love him to bits.

Well I am now going to have a small drink of Malt Whiskey and relax in front of the TV...... think I am all carded out............

Thanks for looking and sharing

Kate x

Various Christmas Creations - Vintage and A Copic

I got up this morning to rain, yes that wet stuff. However it did not take long for the sun to creep from behind the clouds although it has had a fight all morning to try to stay there.

Anyway following on from yesterday.


In the evening, whilst it was quiet and the boys had gone off fishing for the night I decided that it was about time I made use of my "Making Card Magazine, as if I did not start to do so, was considering stopping my order - over the past 6 months have not even used the free papers - what a waste.


Any way there was some lovely vintage papers in it, and a couple of good card layout ideas, so thought I would try them out. These are some of the magazine ideas and some I have adapted to suit the left over papers. (do not like to waste). The top one I added some liquid pearls to the centre of the poinsettia.

Love the vellum's in this months issue - still have some of this left. On this one I added some glitter glue to the scallops around the front image.


The diamond fold I think they called this. It looked complicated but was quite simple, so did a couple of these. Really used up some of my gold mirror card too. I used red glitter glue here for the holly berries as suggested in the magazine. Might keep the page with the measurements on it as it does not quite meet any lines on the score board.


Loved the little images which are not usually my style.


This one I changed slightly and ignored the measurements of the cream and green holly paper and I layered mine on gold mirror card so that the ribbon could be wrapped around the back for the neat finish.


Finally I decided to use some of my trim craft paper stack. Going a little way out and different for Xmas and using one of my favourite Penny Black Stamps and my copics and the clear "Atyou" glitter pen. Loved the black and pink theme (sorry Sam) and really enjoyed colouring in my little snowman.


Well I have just heard that the boys are packing up and coming home. I have the trophies out ready to see who got the winner one and who got the loser one or if actually anyone caught at all. Last score was that Mike was up on knocks but no fish at all.

October for me is one of those months, where everyone and anyone seems to have a birthday, so will have to integrate the Christmas card creating with the birthdays.

Well enough of my ramblings, and look after yourselves.

Thanks for looking
Kate x

Monday, 5 October 2009

Whiff of Joy Christmas Card - Copics

Well woke up again to some lovely sunshine and pleasantly surprised that is was not cold. Matt had decided that he was going to go fishing overnight and spent the day preparing with Michael.

I spent all day running up and down stairs from the Beach Hut to the kitchen assisting them in the preparation.


This is what I created whilst I was being disturbed. Love my new stamp and really enjoyed colouring it in. Used my new "Atyou" glitter pens and numerous copic colours. The double ribbon was intentional, not a new inspirational thing but to cover up a mistake made whilst supporting the lads.

Well off to make myself something to eat, they are ordering pizza to the peg. I will then wonder upstairs to get creative again prior to a friend coming for some support on creating a PowerPoint presentation later.

Hope you all had a lovely day

thank you for looking

Kate xx

Sunday, 4 October 2009

Grace's Memory Book - Postman Pat

Initially apologising if you have tried to leave a comment and you are experiencing problems, I am trying to fix the issue.

Thank you Sam for mailing me to advise me of this issue.

So as you can imagine I spent a good few hours this morning trying to fix the problem. I think I have done this however until some one tells me otherwise I just do not know if I have managed it.

Following on from that I decided to rid the lounge of some plants that when bought were soooooooooooooo nice however after a good few years they have just managed to grow themselves out of their prepared location so have had to go. The sun has been glorious today but the wind had a nip to it, so I did not quite manage to make it to cutting the grass.

I went into my "Beach Hut" and used up the last of the current photo's for Lindz's memory books. This one being for Grace's book.

A while ago now I used these lovely orange papers on a scrapbook page in a class and really loved the colour combo, so purchased some. I think that they are bo bunny but not a hundred percent sure. I got them from Running With Scissors. Then like most things that I buy they have sat in my draws waiting for the opportunity to be used.

This lovely photo of Grace trying to steel Pat's hat is that opportunity. So I created this with the papers, doily punch, another punch currently can't remember its name. My nesties bordabilities. I used some flowers from Running with Scissors and some eyelets from the Hobby House. Flower middles from Boys.

Well off to have a cup of peach tea and start to prepare tea for this evening.

Hope you all had a lovely day

thank you for looking

Kate xx

Saturday, 3 October 2009

New Look Blog - A big thank you

Having not got to my craft room today, as early this morning just after blogging my cricket bat and ball page, I sort of decided to pimp my blog site. Spent ages searching for a suitable template and finally found this one. Although it was easy to upload I ended up trying for several hours to sort out a problem. In the end I had to visit Polly "Artfulwings" and ask Steve if he could assist. Steve sorted out my problem and another little issue. Now all is well.

Big thank you to Steve for your expertise and kindness in resolving my problem.

Thank you very very very very very much. Oh it was lovely to see Polly again also and the coffee was lovely.

Kate xxxxx

Faith's Memory Page - Grandad

Woke up this morning to the wind blowing through the trees, however it is currently dry and may brighten up.

Matt and I have a week off this week, to catch up on all those things we need to do and those things we would like to do. Matt is thinking of a last overnight fishing session with Mike and I am thinking - yes you guessed it - completing a few more memory pages for Lindz my work colleague. It is so good to have her back at work, we all did miss her.

So this is a page inspired by the photo. This is Grandad with Faith and Grace. Grandad was watching cricket and the girls fell asleep on him. I thought long and hard and then came up with the idea of the cricket bat and ball. The background paper the grass, layered onto the red to pick up the red cricket ball. The ball was made using my compass and then edged. The cricket ball lines using the faux stitching and my white gel pen. The bat was easy to draw but the colouring was more difficult. Started out by trying the copics out but it just did not do it for me. So I went to wash my hands and whilst doing this found my wood graining tool in the cupboard under the sink. I used my jo sonya yellow for a base and then dried this. I then used the brown and painted over the top and dragged my graining tool down the bat. Fab effect and it is textured too. I used ribbon to cover the handle.

The words were computer generated, edged and then I used the Christmas green flowersoft just to run under the words. Very simple but I thought it was quite effective.

Well off to make myself my morning coffee, watch the sun try to squeeze through the clouds and then may head off up to the "Beach Hut".

Hope you all have a lovely day and thank you for taking the time to look and read my blog.

Take care

Kate x

Monday, 28 September 2009

60th Wedding Anniversary Acetate Card

Hello all, hoping your day was as bright and sunny as mine. I would first of all like to thank those that take the time to view my blog and leave such lovely comments.

Well as you know I had already altered my little box ready for this card and was spending lots of time covering the "Beach Hut" floor with numerous papers whilst going through the thought processes of making sure everything went well with the embellishments and the colours show through.

So after all of that here it is and hoping you like my first attempt. Oh I add this comment after I finished the original blog.......... get a coffee first.................. you may need it.

The first page has the butter cream stazone on it contrasted with a lovely dark chocolate and cream. With the nesties oval embossed with the mse sentiment and gold liquid pearls to finish it off.


The reverse clearly stating how long the couple have been married. Showing the back of the previous paper as a pale border to a lovely rich brown/gold diamond - representing the diamond anniversary. With the cuttlebug kids 60 on some of the white 12 x 12 paper that I used on the top of the box.


Following on is the mustard yellow dove stamps on the acetate. I had bought and planned to use the dove grey stazone however it did not show. On this one I have made a folder and used some gold ribbon to hold it shut. There is a lovely mse stamp on the front and another mse sentiment inside. Under that is a heart edged base for another mse sentiment, with the gold card just showing to ensure those hearts are visible.


On the reverse of this one a slight change to a pale pink theme. The border showing from the reverse but hiding the yellow stazone doves (it just did not work) Another lovely paper on the top with another mse sentiment and a huge white and pink flower with a little pink button for the centre and some home curled pink wire to add that finishing touch. (oooooooooooooo get me)


The next page moving onto the more romantic shades. Dark Pinks and reds. The white stazone used for a background of love. The pink dotty paper creating a lovely backdrop for the deep red K & Co paper hearts, die cut with the cuttlebug. Another nestie used for the word base, embossed and then mse stamped. I used my punch here to give it a top and then used another cuttlebug folder to create the celebrate underneath. I used some heart folders to create the words on the white die cut hearts and then ran my inked tattered rose roller over them to show the depth. Little red pearls to finish off the pairs.


The next page a little more delicate. The reverse of the dotty pink - a lovely floral paper showing as the border. Using the same paper that I used on the box I used my ribbon punch and threaded a pale velvet ribbon through it. I then used my heart template and found some more gorgeous paper from the K & Co Wedding stack. I used some transparency words I think from the K & Co range - I got these from Running with Scissors a while ago. I then pulled the green from the words and the border and layered the heart onto some left over deep mossy green card. It really pulled it together well.
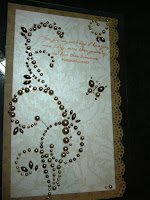


The next page along with the one above - is I think my favourite. Using some of my pearl swirls obtained from the Hobby House - they are so amazing, don't you just love the butterfly. I used the Martha Stewart border punch on both sides of this page so it would show through as double on the next page. A simple mse sentiment in the rusty brown stazone. The acetate colour is green and can be seen better on the next page. The image used was a large stamp from the Range I believe lots of loving words with a heart in the middle although I covered most of it.


This page shows the previous doily punch from the reverse with the second layer on the front of this page, again another lovely transparency sentiment and some double punch butterflies with green liquid pearl cores and glitter wings. Little pearls picking up the top of the doily scallop.


Finally somewhere for the person giving the card to write there own words. A simple butter cream flower on the acetate. With a cream simple paper and on top of that a nestie and mse stamp. Two little silver nail art hearts on the top and edged. A lovely flower from the Hobby House added to complete.


The reverse and final page showing the reverse of the previous card to show off my created by downrightcrafty lily stamp which I coloured in with my copic markers.


I then placed the lovely completed card in it's box after I had placed some cream tissue paper in the box.


Wow it nearly took as long to blog this as it did to make it. Would you think that technology could get a little more advanced to enable us to upload several photo's. I may have to go back to my own website and blog on there, it was so much easier than this, I tell you. Whilst I have been blogging this Sam has uploaded hers and gone for tea :)

I am now starving. So I will leave you to kill yourselves reading this and hope you like it. Thanks for looking and thank you to all of you who share your skills, knowledge and experience with everyone especially Sue (ex Paper Paradise for the creativity used in this project)

Kate x
Saturday, 26 September 2009

Altered Box

Good evening everyone. Hoping that you are all well and looking after each other.

I have spent the week on this little creation. As you can see I had my work cut out for me from the start. I am creating a 60th Wedding Anniversary Acetate Card and needed a box for it to sit pretty in. This was that box as it started out. What a mess.


I carefully peeled off the stickers. Prepared it and then used my Titanium White Jo Sonya paint and created a lovely white starting surface. I then started to get creative and here are the results.


It looks mint although my photography does not show it in it's best light.

Started on the Acetate Card this morning. It takes a lot of thought and you should see how much paper I have scattered around the floor. All that matching takes so much space. Thank heavens for the "Beach Hut". Well going to sit myself down with a lovely cup of peach tea, look after Matt who appears to have a touch of "man flu" and watch the dancing and x factor whilst relaxing sat on my massage chair.

Hope you all have a great evening and thanks for looking.
Kate xx

Sunday, 20 September 2009

So Sorry Photo's of my baby "Star"

Well ok, she is now 6 years old, but still my puppy. She is a dog of all occasions and by that I mean she is part St. Bernard and part Lurcher.

At a year old she dislocated her hip, cause was top half of her body is too big for her lower limbs and the junction needed a little building work.

She enjoyed her six months of hydrotherapy, after her operation. She is on cartlidge builders for life and has a ready supply of pain killers for her little slip ups. Slip ups are when she forgets she is not suppose to act like the Lurcher in her and try to be more like the St. Bernard. She can only go on small controlled walks however loves to run when she can in the garden where she is fully supported by us.

So here she is Sam just for you.


Star says thanks for looking xx

Puppy

Finally the photo's of the little puppy "Betsy" arrived via my e mail. Here are a couple of photo's for you to all aaaaaaaaaaaaaaaaaaaaahhhhhhhhhhhhhhhhhhh at. The second one is Betsy with Lucky her house mate.Adorable don't you think.

Well I am in the middle of creating a box for my next project which is an acetate 60th Wedding Anniversary Card. Need to pimp a box to show it off. Will be using some lovely techniques learnt from Sue, I hope I can make her proud.

Matt has (yes you have guessed it) left me in peace and gone fishing.

Oh, and yesterday. The raised bed got attacked by Matt and I. Not a weed in site. The doc leaf plant and the nettles and thistles are gone. Good job really I did not fancy a gunera replica in the raised bed. We also fixed the fence. Star spotted a cat in her posh garden and ran at it forgetting the fence was there, so fence panels were knocked off. Ooops.

Well chat soon and hope your all well.

Kate x

Thursday, 17 September 2009

Another Catch Up - Lots of Creations and Information

Following on and catching up. The little puppy came to see me. "Betsy" is her name and she is a bassett. She is gorgeous. However, Star my very own little girl, was a little jealous to say the least. Due to her size, she does not do small dogs. They run through her legs and confuse her. Eventually after running off several times Star found a suitable place on the settee, where Betsy could not get her. Betsy arrived in a little travel bag and left in the same manner - bless. Photo's to follow as on the day she did not stand still. Our house was very interesting and so was Star's biscuit bowl.

The baby has not arrived yet and we are still waiting to see if the prediction was correct, I personally now hope it is as I also needed to make a card for another expecting mum for a predicted girl (hope that prediction is correct also) Here is the little girl card ready and waiting.
During the week again, I have been busy finishing off the xmas order. So the final two cards done and again two more for myself (shame on you Ruth - to be so talented and to consider buying your christmas cards. Here are the final two.
Now these cards I feel are pretty special. Other than using my snowflake martha stewart punch and my current favourite papers "crafty individuals" from the Hobby House. The images are stamped onto some really cool paper. I have been frustrated for some time with the manga paper I was using. It is fantastic to colour on but very thin and therefore cuts when using nesties or embossing with the nesties. So I went on a crusade.

Matt took me to the Range on Sunday last and purchased me some art board in a pad, specialist painting stuff... this is very good, but not as good as this, located on ebay and mentioned on one of the blogs I am now following. She has good utube videos on colouring, but I did not need that bit. So this is what I am now using.
It is by Canon and is comic book art boards. (expensive but well worth it - I am a convert. Polly if you want to try a sheet let me know. Here is my very first creation with it.
On Wednesday one of my learners, a lovely lady, came to pick up her certificates and her portfolio. On returning her to her car and wishing her luck with her job search, she opened her boot and presented me with a gorgeous bunch of flowers. It really makes your job worth while when you give so much of yourself and they achieve, but to receive a thank you is the best thing ever. Thank you Debbie. Aren't they lovely.
Someone else who I think a lot of and had asked me to make her some cards, bought me this lovely planner for all my orders. Must get it on the wall and start using it.
I also picked up from Sue's my delivery of foam mount for my stamps that Maz had ordered, thanks Maz and Sue for allowing me to pick it up the next night.

Finally before I end - I was asked to create a going away card for a young lady whose best friend is going to university next week. It is hard when the person has always been with you and they are going to move away. A card is a lovely way to say "I will miss you". So thinking it needed to show lots of sentiments. I ploughed through my MSE unmounted stamps, located one inner and outer and one that just said it all. Before using I mounted these.

Will do a few each time as I go, will finally catalogue them all eventually. My repeats I am taking to Sue's who is going to charge a small fee and put this towards guide dogs for the deaf. Polly also mentioned a swop shop and I was happy to receive a stamp from Maz and will offer her a swop or two before I pass my repeats to Sue.

I then remembered my evening at Polly's and a lovely card we created together and felt I would like to revisit the style. This is what I created.The front with some lovely lace from Rui Tong.
A close up of the words
Even closer of the lovely lace.

This is an MSE inner and outer. But could not resist putting the two together as it just says so much.

Apologise for some of the photography - must improve in this area.

Hope everyone is well and thank you for taking the time to view and read my blog.

Kate xx

Saturday, 12 September 2009

Update Xmas and Baby Boy Card

Over the past two weeks I have been working on creating several xmas card orders. Here are the first selection. Each time I make one, I make one for myself also. Therefore I have completed four card orders and four of my own. So getting there slowly. Here is a photo taken
on my beach hut work top, as you can see the sun was glorious today and the grass looked so inviting. I did venture out and decided to attack two very large weeds in our lovely raised bed. If I had left them there much longer I would have been able to see the flowers from my upstairs beach hut window. I have also shown a close up of one of the red versions and its inside. Papers are from craft creations I believe, I purchased these and many more lovely xmas 12 x 12 papers from the hobby house, along with some of the ribbons and flowers. The little gold bells from Boys, an amazing place to shop for crafty bits. Some of the other ribbon from the Range in Scunthorpe.
This image although a little blurry (sorry) is of a stamp that my husband Matt ordered for me off ebay. It is a black and white silloette of my favourite flower, a lilly and it says "Handmade by Downrightcrafty" It is so ace, I love him to bits for all the support he gives me.

He has been out fishing today in a match and caught an amazing size fish, however he still did not win, which is a huge shame as I think through all his determination he deserves too. He got a lovely sun tan on his face again. Men they never remember the sun cream, fishing is far more important.

Anyway whilst he was fishing I cleared the housework, however still have the ironing to do. (and last weeks oops) and then rushed up to the beach hut and created a little baby boy card,

a friend's little one is due any day now. I will be making a little girl one tomorrow, as although they predict what you are going to have, I know a few that have been wrong. So I am going to be prepared. So here is the card.

Tomorrow I am going to get to cuddle a puppy, my friend is bringing her new addition to see me. Will have to take photo's to show you all, as they are always so cute and you never know it may inspire a layout.

Well hope you are all enjoying the lovely weather, for the time being. Thank you all for your recent lovely comments and thanks for looking.

Kate x

Items for Sale in My Etsy Shop

Related Posts Plugin for WordPress, Blogger...
 
09 10